Lightroom is one cool Adobe tool and I am really happy that I started using it now. I would not call it as being as powerful as Photoshop but it is nevertheless a very handy tool and the tones that you get out of this software is just amazing. Also, it does not appear as intimidating as Photoshop & hence any user can learn the ropes very easily. One of the other things that I found to be super cool with Lightroom is the ability to use the 'Presets' feature. There are some 15 presets that come packed with the software and then there are a whole lot of presets that have been developed by people around the world that can be downloaded and used. Even though these presets may not a perfect fit for the photo you have, they will surely be a good starting point from where you can start tweaking around to get the tones you have in mind. Given below are a couple of photos that I took in Chennai Sangamam processed using Lightroom.
During the second week, my wife found a gift that she had with her as the subject for the 'Project 52' shoot. It was a bottle with a glass ship inside. The carving was so beautiful and I immediately knew that it would make a very good subject. We tried shooting it with the normal tube light illumination but the image that we got were very flat and did not impress us. Again my wife came with the brilliant idea of using candle lights for the lighting. It turned out to be a great choice and the resulting photos were pleasing for both us. The photo that I posted had the right amount of lights and shadows and hence made it to flickr.
The harder part of course was on making the choice for the posting. There were at least a couple of images that were good and the one above is something I loved a lot. The composition was spot on with the candle lights being placed in the corner showing the source of the lights and the shadows were also good. The reflection on the wall of the flame was the sore point and I felt it was distracting. Even Post Processing (PP) would not save those bokehs and hence the reason to reject this image.
Landscape photography is the supreme test of the photographer; and often the supreme disappointment – Ansel Adams
When Ansel Adams, The Master of landscape photography, talks about landscape photography in this fashion, it makes sense for all of us to take care of some basic aspects when taking landscape photos. Thankfully, taking care of a few aspects would make sure that the photos that we take are visually pleasing and compositionally brilliant. In the coming articles, we will look at these techniques to take small but significant steps towards becoming better landscape photographers.
Tip #1: Scout the spot for different angles
Our first instinct when we come across a picturesque location would be to start shooting without actually looking around for the perfect angle & composition. We would be better off if we can hold off our instincts for sometime to find an ideal location; a location where we can use the angle of light, patterns or textures, lines or curves for making our composition even better.
Tip #2: Make use of the golden hour
Early mornings (½ hour before sunrise & 1 hour after sunrise) and late evenings (1 hour before & ½ hour after) are the best times to capture the mood of the place. The light is not too harsh and offers great play of lights to be captured.
Tip #3: Always use a polarizer
Polarizers help in cutting down reflections and enhancing the colors. Sky colors are darkened and dark skies offer a great background for landscape shots. The usage of a polarizer filter is different from the other filters and the important point is that it needs to rotated, the frame checked for color enhancement and then the picture clicked. Not rotating the filter would leave the possibility of getting enhanced colors entirely to chance and not choice!
Tip #4: Carry a tripod around
The pains of carrying a tripod will vanish the moment you capture a stunning picture which would have been impossible to take without a tripod at hand. It is not only useful for taking photos without shake but also to expand the creative possibilities like slow shutter speed shots, panoramic shots or multiple exposure shots that are used in generating vibrant looking HDR’s.
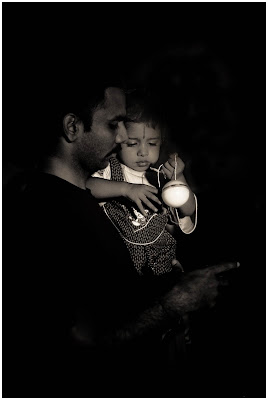
The chennai sangamam 2009 proved to be a great success not just for the organizers and the people participating in it but also for photographers like me. There was a whole bunch of opportunities for people photography in the parks where these events were being organized and I came back with some images that I was very pleased with. My Canon 50mm lens provided very handy in these low light conditions and the only thing that I regretted is about attending just 2 days of the celebration. I have decided to make much more use of the chance presented in Chennai Sangamam from the next year onwards.
Many of these shots would have found its way into my flickr account if not for my decision to post only nature photographs in my stream going forward. There will be people in my shot but they would be there to add value to the shot & not as the main subject. This left me with the option of posting those candid shots (which I click occasionaly) in my blog here.
These are unedited shots(except for resizing).
Click #1: A kid enjoying the show (He is sitting on the shoulders of a person!)
Click #2: A family enthralled by Kadri Gopalnath wield his saxophone like a magical wand
Couple of our photography friends had gone to Guindy park for a photo shoot during the weekend and there were this beautiful ducklings that were present in one of the cages. It was a treat to watch them always walk around their mother following her wherever she went and within a distance of 5 inches.
There is nothing more irritating than finding that a photo which could have easily become a great shot turning into a damp squib for the simple reason that you failed to hold the camera steady. There could be 'N' number of reasons on why I could not hold the camera steady at the moment I pressed the trigger but those does not qualify as consolations for missing out on a great shot. The photo given below was taken at Vaitheeswaran Temple and the streak of light was so good to be missed. We were running late in terms of completing the darshan of all the important deities and so I had to be very swift when taking this photo. Unfortunately, I failed miserably and I still rue about the missed shot.
Even though there is Photoshop to give us a perfect starburst effect for light sources, one of the chance discoveries that I made when shooting against the sun is that we get the same star burst effect when we have a smaller aperture value. An aperture value of F11 or above somehow always gives me a star burst effect. Given below is one such photo where I got a decent star burst effect with the above technique. If there are other ways, please let me know and I would be greatly interested in trying.